I started up my culturing apparatus the other day to test its effects as a CO2 room scrubber. It's currently sitting in my window sill with the air pump on a timer. It has been growing fairly quickly. I've been weighing the apparatus every other day and am surprised to see such an increase in such a small container. The true weight test will be when I start making dry measures of the filtered algae cells which should be sometimes late this week. Until my filtration apparatus comes in the mail I will be using coffee filters (about 20microns) to filter the algae out of my system.
I produce roughly around 200g of CO2 daily in my bedroom (1kg daily into the environment).
1 gram of algae dry mass is approximately equivalent to 1.8g of CO2.
Therefore I would need about a 30 gallon tank to filter out the necessary CO2 produced in my bedroom. Yes I am currently using a 1.5L vessel to perform these duties, this is of course just a test to see how efficient my homebrew device is compared to some of the "big boy's" in the industry.
Monday, June 21, 2010
Wednesday, May 5, 2010
Houston we have a problem
So I'm still trying to figure out exactly how I'd like this to run. I was able to setup the pump onto my reactor however I keep getting air pockets throughout my tube assembly and am trying to figure out the best way to fix this. Whether it mean I change my pump assembly around or figure out another plan of action. Water is currently being pumped from the bucket below into the right side of the assembly and then gravity fed back into the bucket from the left side. Below is a current picture of my setup.


Monday, May 3, 2010
Carbon Neutral Energy
I wanted to find out exactly how much CO2 was in the atmosphere as these numbers would be used in the development of a global energy policy change.
- Air pressure at sea level is about 14.5 lbs. / sq. in. or 10 metric tons / sq. m.
- Earth's radius is 5,925km and therefore the surface area of Earth is 441 million sq. km or 441,000 billion sq. m.
Therefore the weight of the Earth's atmosphere is about 4.41 million billion metric tons.
Earth System Research Laboratory at Mauna Loa, Hawaii has stated that the atmosopheric CO2 concentration has increased by 2.02 ppm from last year. 2.02 ppm can also be expressed at 2.02 mg/kg of atmosphere or 0.000202% of the total atmospheric weight.
Therefore the weight of CO2 that was added to our atmosphere last year was 8,908,200,000 metric tons.
- CO2 weighs about 3.67x as much as carbon or carbon is 27.3% of the total weight of CO2
Therefore, of the CO2 in the atmosphere, 2,431,938,600 metric tons of it is strictly carbon which is what we are interested in.
Vegetable oils on average have a carbon chain length of about 18 carbons with 1 double bond. This would give us a chemical equation of C18H34O2 with carbon making up 76.54% of the overall weight of the vegetable oil. This means we will need to create 1.31 metric tons of oil for each ton of carbon absorbed.
This means we would need to create 3,177,395,568 metric tons of oil to absorb the amount of carbon released to the atmosphere last year.
Each mL of vegetable oil weighs about 0.92g; taken from the Spectrum - Chemical, Safety and Laboratory Products Catalog.
Therefore the weight of oil we now have would take up about 2,923,203,923,000 liters of volume. That's almost 3 trillion liters of vegetable oil.
This would also be expressed as 772,228,780,000 gallons or 18,386,399,500 barrels of oil.
Current algae production numbers suggest that oil can be harvested at about 36,000 gallons per acre per year.
WHAT DOES THIS ALL MEAN?
With are current technological breakthroughs in algae biotechnology, we would need to create 21,450,799 acres worth of algae farms in order to sequester the carbon the world releases to the atmosphere in the form of CO2. This is a little bit larger than the area of South Carolina. If each country were to build farms on their land based on their contribution to the CO2 increase, the United States would be building farms that would be about the size of New Jersey. As technology improves, the amount of oil harvested per acre should increase and these areas of use should come down. However this just shows how much of an impact we as humans have on our environment.
Sunday, May 2, 2010
PhotoBioReactor Step 1
I've been planning a closed-loop photobioreactor in Google SketchUp for a few months now and have finally decided to get off my butt and start bringing it to life. I'm doing a benchtop scale version first for a few reasons:
1) Make sure it works before spending more on a larger version.
2) Easier to take pictures of.
3) I can build it by myself in about a weekend
You can check out the SketchUp file at Google's 3D warehouse HERE.
The reactor will be built in three parts: the photo-collector section, the sump section, and the electronics/light focuser.
I just finished building the photo-collector section tonight. It took me about 5 hours today. My circular saw wasn't working so everything had to be cut by hand. Lets just say I got my workout today. :-P I will hopefully be posting a tutorial once I finish.
Here's a picture of what I have done at the moment.

Sunday, April 25, 2010
Everyone's busy, as am I. I finally have my culturing apparatus up and running.


Supplies(First 4 I picked up at my local Petco (where the algae hobbiest go :-P)
Simple single line air pump
Some air line tubing
Air stones
One way air valves
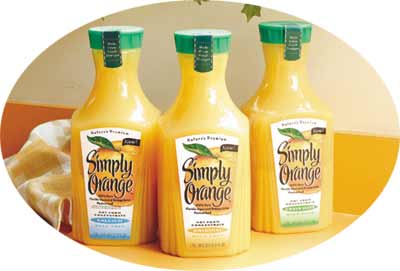
A Simply Orange bottle.
Irrigation tubing connector set (Picked up from Lowes)
UV-resistant Irrigation tubing
Aquarium Silicone
Steps:
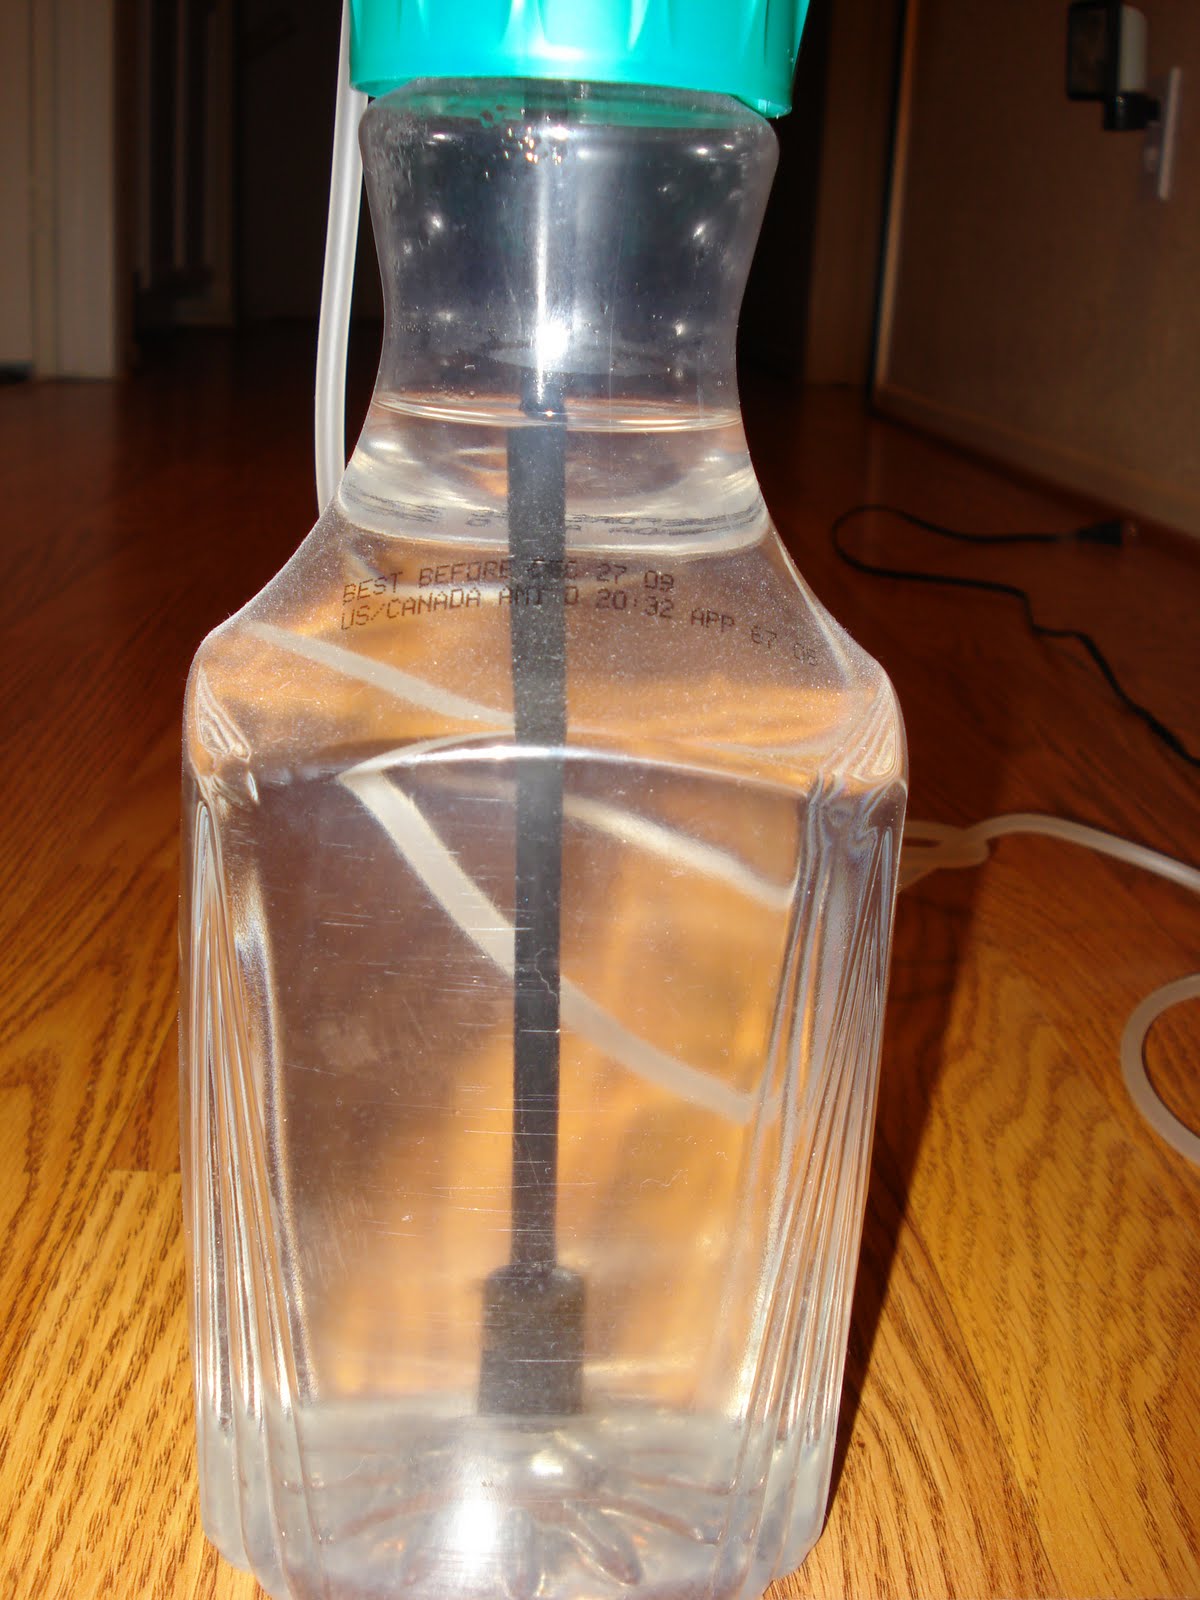
1) Remove the labels off of the Simple Orange bottle. You can use any type of bottle however I liked that these bottles had a very wide mouth and therefore top. They are also made out of polyethylene terephthalate and so do not grow algae in these if you plan on eating or drinking it, especially if you use these bottles outside as they may leach chemicals that can disrupt your endocrine system.
2) Drill two holes into the top of the bottle top making sure they are far enough apart that they don't become one giant hole. (Went through a few bottles to get it right). Make sure these holes are large enough for the irrigation straight connectors to fit into but not larger than that.
3)Silicone into place one irrigation straight connector into each hole facing away from each other. Make sure that about half of the connector is outside of the bottle and the other half is inside.
4)Cut an 8-10" long piece of irrigation tubing and attach it to the inside of one of the straight connectors now hopefully in place on the bottle-top.
5)Place an air stone of the other end of the long piece you just cut.
6)Cut 2 pieces of 1" irrigation tubing and attach them to either side of an L-connector. (I chose the UV-resistant tubing and I already knew it would fit the connectors and it was more firm than the normal airline tubing.
7)Attach this L-connector to the outside of the OTHER straight connect.
8)Attach a one way air valve to the other end of the L-connecter that you just connected.
There should now be two unused ends between the two straight connectors
9)Place your airline tubing from a check valve and then to your air pump.
10) Attach the business end of the airline tubing into the top of the straight connector you have attached to the airstone.
Congratulations you are done!
This setup allows you to sterilize the bottle and close the cap allowing air to flow in from the air pump and out through the one way air valve. A air-line microbial filter can be added into the equation to make sure the air going into the setup is sterile however this can add up $ and so not always the best thing unless you absolutely need it. You can find them at http://www.argos-tech.com/c-4-p-53-id-4.html for example.
This bottle setup can be placed in series as well adding one bottle onto the output of the bottle before it. This allows you to use a single tube air pump with multiple samples. If these samples are going to be of different strains or of different experiments, make sure that you place a bottle of NaOH between them in the series to kill of any air hitchhikers. And there you have it a completed culture vessel for your at home culturing needs. A little more complicated than some others however It will last you a long time. The pictures below are of my bottle before I added my newest strain of C. vulgaris I just got in the mail from Carolina.
I'm still getting the hang of blog spot so I'm just putting all of the pictures at the end.
Completed Setup


Irrigation tube attached to airstone

Subscribe to:
Posts (Atom)